• Skip to primary navigation
  • Skip to main content
  • Skip to primary sidebar
  • Skip to footer
cropped BoostIT Invoice Logo scaled 1 e1642102882713

Boost IT

IT Management, Cybersecurity, & Cloud

  • SERVICES
    • IT MANAGEMENT >
      • Take an IT Self-Assessment
      • IT Assessment
      • 24/7 Help Desk Support
      • Remote Workforce
      • Software Updates
      • Remote Server Monitoring
      • Reporting & Documentation
      • Wi-Fi
    • CYBERSECURITY >
      • Take a Cybersecurity Self-Assessment
      • Cybersecurity Assessment
      • Endpoint Detection & Response
      • Multi-Factor Authentication (MFA / 2FA)
      • Security Operations Center (SOC) Support
      • HeatShield Perimeter Firewall
    • IT CONSULTING >
      • vCIO – Virtual CIO
    • CLOUD >
      • Data Backup & Disaster Recovery
      • Microsoft Office 365 & E-mail
      • Cloud File-Sharing Platform
      • Business Phone System
    • Frequently Asked Questions
  • OUR CLIENTS
    • Engineering
    • Financial Services
    • Healthcare
    • Real Estate Development
    • Testimonials
    • Transition to Boost IT
  • OUR TEAM
    • One IT Question
    • Our Proven Process
    • Our Partners
  • BLOG
  • CONTACT
    • Book a Meeting
    • Client Portal
    • Remote Support

How To

How to share contacts in Outlook 2016 and Office 365?

March 7, 2018 by Boost IT

How to share contacts in Outlook 2016 and Office 365 with specific people in your organization

Knowing how to share contacts in Outlook 2016 and Office 365 can be a huge timesaver for companies of any size.

The default Contacts folder in Outlook is created in each Outlook profile. This folder can’t be renamed or deleted. You might have additional contact folders. You can share any of these folders by doing the following:

  1. In People, in the folder pane, click the contact folder that you want to share with a person in your organization.
  2. Click Home. Then, in the Share group, click Share Contacts.Shared contacts button
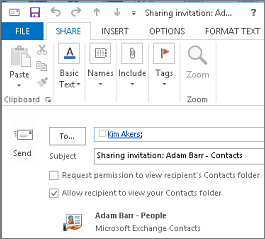
  3. In the To box, enter the name of the recipient for the sharing invitation message. If you want to, you can change the Subject.How to share contacts in Outlook 2016 and Office 365
  4. If you want to, request permission to view the recipient’s default People folder. To do so, select the Request permission to view recipient’s Contacts folder check box.

    NOTE: If you want to request access to a contacts folder other than the recipient’s default People folder, you must send an email message that asks for permissions to that particular folder. This option only requests access to the recipient’s default People folder.

  5. In the message body, type any information that you want to include, and then click Send. Review the confirmation dialog box, and then if correct, click OK.
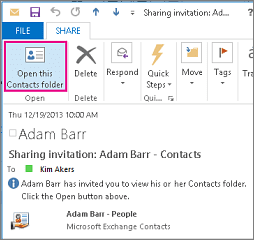
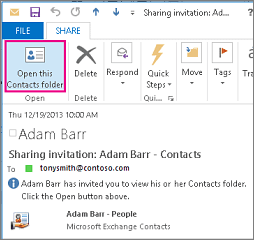
  6. The person in your organization receives the sharing invitation in email, and clicks Open this Contacts folder.Received share contacts invitation inside your organization

Share with specific people outside your organization

The default Contacts folder in Outlook is created in each Outlook profile. This folder can’t be renamed or deleted. You might have additional contact folders. You can share any of these folders by doing the following:

  1. In People, in the folder pane, click the contact folder that you want to share with a person outside your organization.
  2. Click Home. Then, in the Share group, click Share Contacts.Shared contacts button
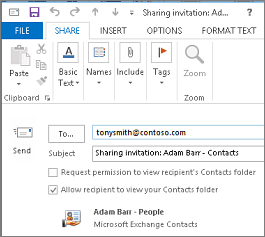
  3. In the To box, enter the name of the recipient for the sharing invitation message. If you want to, you can change the Subject.Draft share contacts invitation outside your organization
  4. If you want to, request permission to view the recipient’s default People folder. To do so, select the Request permission to view recipient’s Contacts folder check box.

    NOTE: If you want to request access to a contacts folder other than the recipient’s default People folder, you must send an email message that asks for permission to that particular folder. This option only requests access to the recipient’s default People folder.

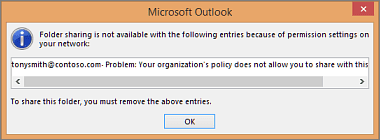
  5. In the message body, type any information that you want to include, and then click Send. Review the confirmation dialog box, and then if correct, click OK. If the following error displays when you try to send the sharing invitation, sharing contacts with people outside of your organization is not supported by the sharing policy for your organization. Only an admin in your organization can change the sharing policy for your organization. For more information, see the end of this section.Error message when you try to share contacts outside your organization
  6. The person outside your organization receives the sharing invitation in email and clicks Open this Contacts folder.Received share contacts invitation outside your organization

If you receive an error when you try to share your contacts with someone outside your organization, contact the person that manages your email account.

Share a contacts folder with everyone

  1. In People, in the folder pane, click Contacts.
  2. Click Folder. Then, in the Properties group, click Folder Permissions.
  3. In the Name box, click Default.
  4. Under Permissions, in the Permission Level list, click Publishing Editor or any of the other options.

Revoke or change other people’s access

To change or revoke someone’s access permissions to your contacts folders, do the following:

  1. In People, in the Folder Pane, click the contacts folder for which you want to change permissions.
  2. Click Folder. Then, in the Properties group, click Folder Permissions.
  3. On the Permissions tab, do one of the following:
    • Revoke or change access permissions for everyone      In the Name box, click Default.. Under Permissions, in the Permission Level list, click None to revoke permissions or any of the other options to change permissions.
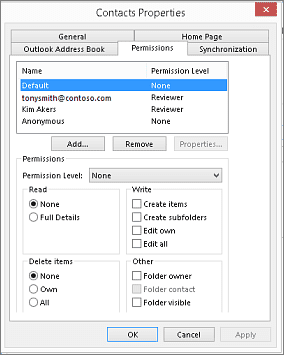
    • Revoke or change access permissions for one person       In the Name box, click the name of the person whose access permissions you want to change. Under Permissions, in the Permission Levellist, click None to revoke permissions or any of the other options to change permissions.Contact folder properties permissions tab
  4. Click OK.

Folder sharing permissions

With this permission level (or role) You can
Owner Create, read, change, and delete all items and files, and create subfolders. As the folder owner, you can change the permission levels that other people have for the folder. (Doesn’t apply to delegates.)
Publishing Editor Create, read, change, and delete all items and files, and create subfolders. (Doesn’t apply to delegates.)
Editor Create, read, change, and delete all items and files.
Publishing Author Create and read items and files, create subfolders, and change and delete items and files that you create. (Doesn’t apply to delegates.)
Author Create and read items and files, and change and delete items and files that you create.
Nonediting Author Create and read items and files, and delete items and files that you create.
Reviewer Read items and files only.
Contributor Create items and files only. The contents of the folder don’t appear. (Does not apply to delegates.)
None You have no permission. You can’t open the folder.

You can create custom permissions by selecting the appropriate check boxes and options under Permissions.

Filed Under: How To Tagged With: Office 365

How to install SonicWall Mobile Connect on Windows 10?

February 8, 2018 by Boost IT

How to install SonicWall Mobile Connect on Windows 10

Description

This article explains how to install SonicWall Mobile Connect for Windows 10. Mobile Connect is the recommended VPN Client for Windows 10.

Cause

Resolution

SonicWall Mobile Connect for Windows 10 is installed from the Microsoft Store.

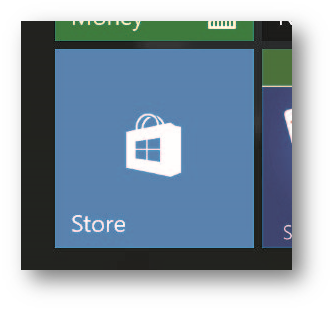
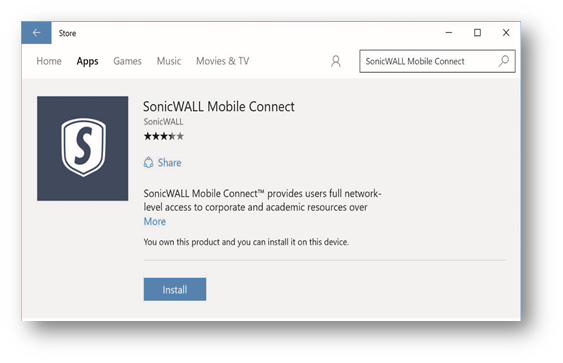
1.On your Windows 10 device, launch the Store app.

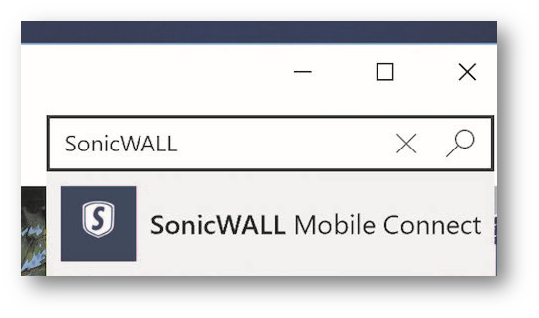
2. In the search field, enter SonicWall Mobile Connect and click Enter.

3. In the search results, select SonicWall Mobile Connect.

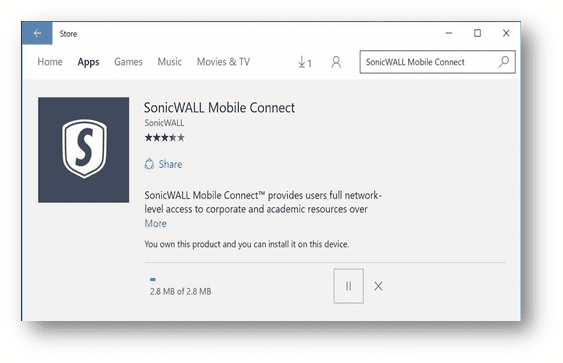
4. Select ‘Install’. The app will begin downloading and install on your device.

How to configure SSL-VPN connections using Mobile Connect on Windows 10

5. When installation is complete, the SonicWall Mobile Connect icon will appear in the list of applications
on your Windows 10 device.

How to configure SSL-VPN connections using Mobile Connect on Windows 10

Configuring VPN Connections:

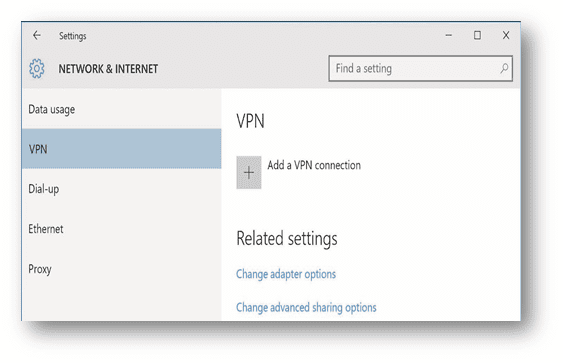
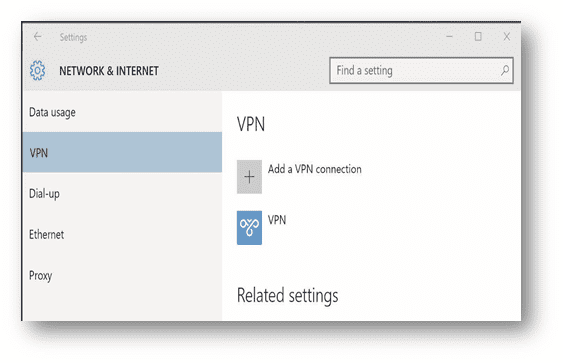
1. Launch the Settings app and navigate to Network & Internet > VPN.

2. Under VPN, select Add a VPN connection.

How to configure SSL-VPN connections using Mobile Connect on Windows 10

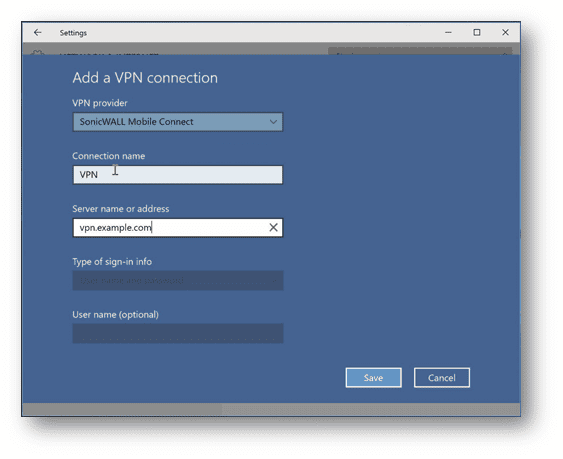
3. In the Add a VPN connection window, select SonicWall Mobile Connect as the VPN provider.

How to configure SSL-VPN connections using Mobile Connect on Windows 10

4. After entering all the required information, click Save.

NOTE: If a custom port is required, then the server name must be entered in URL format in the
Server name field, for example .

Once the VPN connection is successfully created, the VPN connection name appears in the list of
connections and in the VPN section.

How to configure SSL-VPN connections using Mobile Connect on Windows 10

To establish a Mobile Connect VPN session:

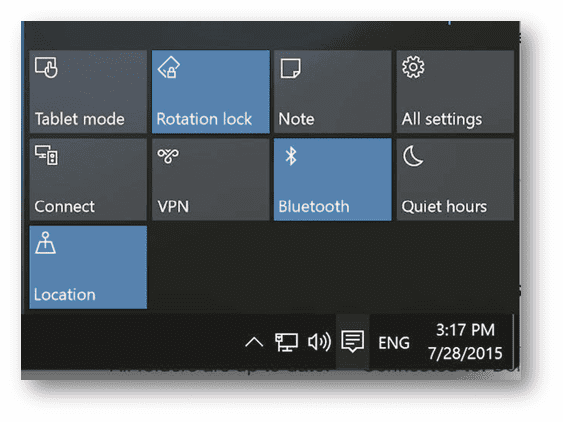
1. In the Action Center, select the VPN to open the Settings app and connect the VPN by selecting Connect.

How to configure SSL-VPN connections using Mobile Connect on Windows 10

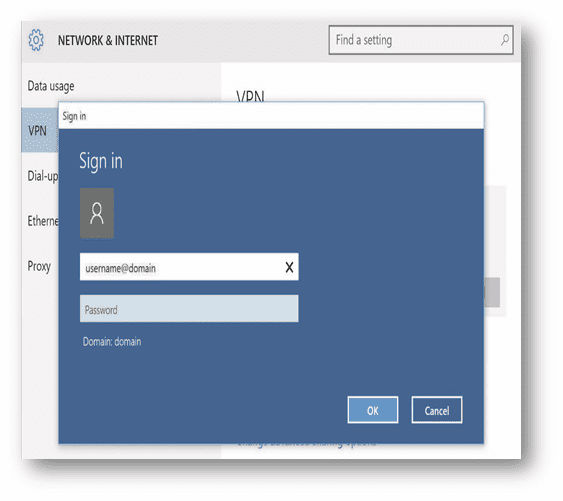
2 Enter your username and password when prompted and tap OK. Note that the Windows Sign In screen
accepts the  SonicWall SRA/Firewall appliance domain or the SonicWall EX-Series Login Group

value as the Microsoft domain portion of the username:
>>Username@Domain OR Username@LoginGroup

>>DomainUsername OR LoginGroupUsername

Example 1: jdoe@Corp-DEMO or Corp-DEMOjdoe, where Corp-DEMO is the name of the domain for the SRA
appliance/Firewall .

Example 2: jdoe@CORP or CORPjdoe, where CORP is the Login Group for the EX Series SRA appliance.

How to configure SSL-VPN connections using Mobile Connect on Windows 10

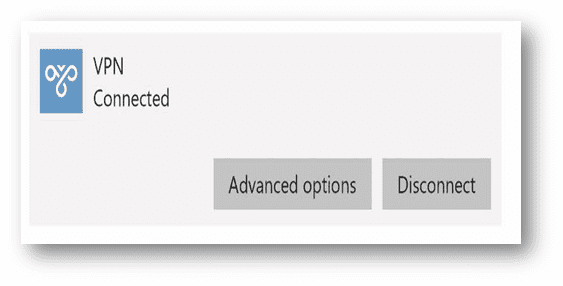
When the connection is successfully established, the Status changes to Connected and the Disconnect
button replaces the Connect button.

How to configure SSL-VPN connections using Mobile Connect on Windows 10

Once connected, you can access the remote network. The Networks screen shows the status of the VPN
connection.

How to configure SSL-VPN connections using Mobile Connect on Windows 10

Last Updated: 4/17/2023

Source: How to configure SSL-VPN using Mobile Connect on Windows 10

Looking for SonicWall support and Cybersecurity services to protect your bank accounts, financial and company data?

Contact Us Today!

Filed Under: How To Tagged With: SonicWALL, SSL-VPN

How To Free Up Disk Space Using Disk Cleanup?

August 22, 2017 by Boost IT

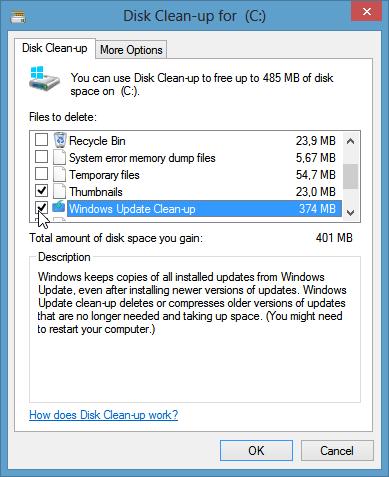
How To Free Up Disk Space Using Disk Cleanup

One of the most common questions we get asked is “How do I speed up my PC without upgrading it?” so we tell our clients How To Free Up Disk Space Using Disk Cleanup. Cleaning up your PC’s hard drive frees up drive space and makes it run faster. One of the easiest ways to clean up files you don’t need is by using Disk Cleanup, which is a built-in tool in Windows 10 and Windows 7.

How To Free Up Disk Space Using Disk Cleanup

How To Free Up Disk Space Using Disk Cleanup in Windows 10

  • To delete temporary files:

    • Search for Disk cleanup from the taskbar and select it from the list of results.

    • Under Files to delete, select the file types to get rid of. To get a description of the file type, select it.

    • Select OK.

  • To free up even more space, you can also delete system files:

    • In Disk cleanup, select Clean up system files.

    • Select the file types to get rid of. To get a description of the file type, select it.

    • Select OK.

How To Free Up Disk Space Using Disk Cleanup in Windows 7

  1. Open Disk Cleanup by clicking the Start button . In the search box, type Disk Cleanup, and then, in the list of results, select Disk Cleanup.
  2. If prompted, select the drive that you want to clean up, and then select OK.
  3. In the Disk Cleanup dialog box in the Description section, click the Clean up system files button.
  4. If prompted, select the drive that you want to clean up, and then select OK.
  5. In the Disk Cleanup dialog box, on the Disk Cleanup tab, select the check boxes for the file types that you want to delete, and then select OK. To remove data from a previous installation of Windows, select the Previous Windows installation(s) check box.
  6. In the message that appears, select Delete files.
  7. Go back to Computer in File Explorer, select the drive you cleaned up, and then select Refresh. If you need to free more space (the drive is still marked red), go to the next tip.

See also: How To Maintain Your Server or Use Disk Cleanup

Filed Under: How To Tagged With: Maintenance

How to Avoid Phishing Scams

February 13, 2017 by Boost IT

From e-mails to pop-up ads to websites, phishing scams are sophisticated and come in many different forms. They are bombarding everyone from everywhere – on desktops, smartphones, tablets, and other devices. They are one of the most common security challenges that businesses face in keeping their information secure.

Cybercriminals are devious in using phishing scams to get sensitive information. Even when the business is proactive in their internet security, all it takes is one employee to fall victim. For businesses to protect valuable data, they need to regularly train employees on how to avoid phishing scams.

10 Tips for Avoiding Phishing Scams

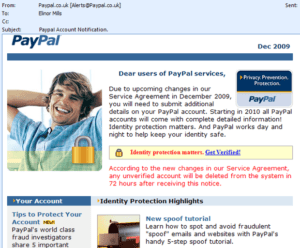
  1. Watch out for e-mail spam. Learn how to identify suspicious emails by looking at who sent it. Cybercriminals will send an email under a name that the employees will recognize and design the email to look the same as the company they pose as. But it is fake. Spelling errors and strange grammar mistakes can be an alert to phishing scams. Banks don’t send emails with links asking for information. And legitimate companies don’t send spam advertisements.
  2. Check the source of incoming e-mails. One of the easiest ways to test an email is by hovering your mouse over the sender’s name to determine the email address of origin. You can also review the link destinations without clicking on them by hovering the mouse over the link to determine the web address, or URL, that is being referred to. Hovering over a link will show you where the link is redirecting you on the World Wide Web. Scammers might list the URL in the email but then have the link directed to another address. They also might link from a phrase, title or button that is easy to click on. If it is not a recognizable email address or URL, beware!
  3. Don’t click directly on links. Some of these fake websites are so well done that it’s quite impossible to tell them apart unless you look at the URL. But even the URLs can be deceiving because they use extensions to impersonate the company. If you are expecting an email, you are more likely to unknowingly click on the link. Don’t. Instead, verify the correct URL (don’t copy it from the email) and type it directly into your browser.
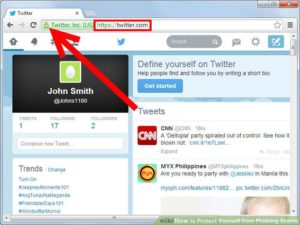
  4. Never enter information on pop-up screens. Cybercriminals are using pop-up screens on popular websites that deceive you into thinking it is directly from the site. But a legitimate company will never ask for information on a pop-up screen. They will bring you to a secure page to get information. Make sure you are on a page that has a lock icon in the address bar.
  5. Never provide personal and confidential information. Many companies have policies about what information they ask for and how they obtain that information. Learn the policies. It is highly unlikely that a legitimate company will ask for sensitive information in an email or through a link.
  6. Think twice before entering information. Some information is best not sent via email or by completing an online form. If you have any doubts, don’t risk it. The best way to prevent phishing is to consistently reject any email or news that asks you to provide confidential data.
  7. Don’t download from unreliable sites or unknown senders. Today’s browsers have built-in security that may give you a warning message stating a certain website contains malicious files. Do not download. Download files only when you are certain what you are downloading and know you are on a legitimate site. Also, do not click on links to download files or open attachments from unknown senders.
  8. Beware of new phone scams. Sophisticated techniques include pop-up windows that give a warning of a virus or malware and ask you to call a number immediately. But the number goes to a fake call center that asks for information and may even convince you to provide remote access to your computer. Be very cautious of phone scams tied to pop-ups. Do not divulge sensitive information over the phone unless you are certain who you are talking to.
  9. Phishing knows all languages. Cybercriminals are finding out all they can about their victims and will send scams in another language that you speak. If you don’t typically go to the Spanish site for your bank or other website, you would have no reason to get an email in that language. Delete it.
  10. Use common sense and good judgement. Cybercriminals are always changing their techniques to be more devious in getting sensitive information. One of the latest techniques to hit the news is of a fake message that went to employees via email. The message appeared to be sent from the CEO and asked for W-2 information. It was well-timed but not consistent with company policy and not from the CEO’s email address.

Understanding how to avoid phishing scams is critical for protecting you and your company. You should always have the most current updates for your operating system and website browsers on your device, and protect your device with a firewall, anti-malware, anti-spyware, and anti-virus software. Boost IT can assist you in maintaining the proper security. Call us for more information at 404-865-1289.

Filed Under: Cyber Security, How To Tagged With: cybercriminals, email spam, phishing, scams, security challenges

How to Get Started with Office 365

February 2, 2017 by Boost IT

If you or someone from your company recently signed up for Office 365, that’s great. You now have many tools and features at your fingertips for multiple devices. With Office 365, there are new, easy  ways to work from your phone, tablet, desktop, or laptop Mac or PC. Here’s how you start.

Getting Started

Unlike software that gets installed on one device, like your desktop, Office 365 is accessible on all your devices so your work goes everywhere you go for easy access, resource sharing, data storage, and more. Have your IT professional install it on your PC, laptop, tablet, and cellphone. Or if you are installing it yourself, you’ll get a welcome email with a user ID and password. Go to the link at portal.office.com to sign in. With your first sign-in, change your password. You’ll be directed to the home page where you will find the installation for the Microsoft Office Suite, if your plan includes this. Install the Office software applications on your PC for the latest versions in Word, Excel, Power Point, etc. You will also want to configure Office 365 on your other devices. Refer to our instructional articles on Configure Office 365 on Android and Configure Office 365 on iPhone / iPad for assistance.

The First Days

When you get started with Office 365, you will be able to begin working on documents, increase collaboration, and improve communication from anywhere. We highly suggest you familiarize yourself with the tools and features. There are many helpful articles and videos provided directly from Microsoft. Here is an overview of three of the basics.

Outlook

Keeping on the go is easier when you use email and the calendar in Outlook. To begin, import your emails and contacts from your current email system. The method for importing will depend on whether you are using Gmail, Yahoo, Outlook.com, or another email system. Refer to Microsoft’s migration instructions here or contact Boost IT for assistance in migrating your Exchange Server or from your old email provider. Migrations can be done remotely and easily. A great benefit to help you stay productive is your ability to connect with multiple accounts in the same place. You’ll need to setup Outlook Web App. The app will also help you quickly and easily manage your Office 365 calendar so you can share and view multiple calendars and they stay in sync on all devices automatically.

OneDrive

OneDrive offers cloud storage, secure files, and easy access from multiple devices from almost anywhere. It’s easy to save your documents in OneDrive and they are in sync on all devices all the time. Simple select OneDrive as your drive option when saving files from your email, Word, Excel, or other Office Suite. You can also let people you collaborate with see and edit your documents in real-time via sharing. To share a file you are working on in the Microsoft Office Suite, save it in OneDrive first and then go to File and select Share.

Skype for Business

Skype for Business lets you stay in touch with coworkers, vendors, and clients through features such as IM, conferences, phone calls, and meetings. To access, you will use the same name and user ID as in your Office 365 login. If you installed the Microsoft Office Suite, then Skype was included in the download. From here, you can open it and start running more effective meetings. For a personal touch, use the video features. To share documents during your call, use the presentation features.

For assistance on migrating to Office 365, Boost IT offers support plans that are ideal for your business. For example, we can help move your Exchange Server into your subscription and expertly manage your hardware, software licensing, updates, and maintenance with our Office 365 business premium services. For information, contact us at 404-865-1289.

Filed Under: Cloud, File Sync & Share, How To Tagged With: Configure Office 365, Get Started with Office 365, migrating to Office 365, Office 365, OneDrive

How to Increase Productivity with Cloud Computing

January 27, 2017 by Boost IT

You have probably heard business professionals talk about the ease of working in the cloud and increasing their productivity, but what does that mean? Many SMBs are finding out just how effective cloud computing is. With its continued growth in popularity, cloud resources and services become more accessible, available, and secure.

3 Ways the Cloud Increases Productivity

Document storage

No more slowing down your computer with an abundance of files, waiting for a large file to be emailed from a coworker, or using VPN. With cloud services, such as RocketSync, Google Docs, Dropbox and OneDrive, it is simple to upload any type of document into the cloud for access when you and other authorized users need it. This is especially valuable for large documents and collaborated project files. With the cloud, you can better manage big data and have the tools to analyze your data. Everyone who has access gets the latest revision of a document so you no longer have to fumble around looking for a USB drive, email changes back and forth, or have multiple copies of the same document.

Multiple devices

With so many people on the go, having the ability to access files on multiple devices, including phones, tablets, Mac and PC, is incredibly productive. Mobile access is an extremely important feature in the modern business environment. You can add something to your task list while waiting for a meeting, check your e-mail from home, sync all your sent messages in one mailbox, and review that financial spreadsheet on the road. SMBs are finding out how much more productive they are now that they can access files when other devices can’t connect but the mobile can. There is no more need to waste time going back to the office to access files. And when Wifi is available, being able to pull up files in the Cloud allows you to pick up where you left off no matter which device you are using. Plus, there are no more worries about the ability to open file extensions since the cloud services keeps everyone updated with the current software versions.

Simultaneous Access

Cloud services make sharing resources with multiple users an everyday practice. Many businesses are turning to software in the cloud instead of having to purchase multiple copies that can be costly. This is a fee-based service that includes updates for the technology to keep you on top of trending tools and features. Imagine all those updates being done automatically in the background. There are several collaboration tools and features in the cloud that are quick and easy for employees to use. From accounting to project management and customer relationship management (CRM), multiple cloud access has increased productivity so all your team members can use the data simultaneously. The result is a more connected workforce.

As an SMB, leveraging the most effective and economical solutions possible is important to your success. Cloud computing is one solution that can increase productivity. You can continuously access files and use apps when you are on the go. You can also share documents with your team with a click. These are just a few of the ways to increase productivity. To learn more about how our clients are using cloud services to grow, spend less on hardware, and decrease maintenance costs, contact us at 404-865-1289, complete our contact form, or read our Case Study on Dexter Companies.

Filed Under: Cloud, How To Tagged With: increase productivity

  • « Go to Previous Page
  • Go to page 1
  • Go to page 2
  • Go to page 3
  • Go to page 4
  • Go to page 5
  • Go to Next Page »

Primary Sidebar

Have questions about cybersecurity?

We've successfully protected Healthcare, Legal, Financial Services, Engineering, Manufacturing, Non-Profit & Real Estate Development organizations for over 20 years.

Click below to see the questions on your next cyberinsurance application!

See the cyberinsurance application

Footer

Next Steps

Start with the SERVICES menu above.

Take an IT Self-Assessment.

Take a Cybersecurity Self-Assessment.

Read Case Studies about how we’ve helped our clients transform their organizations.

View Testimonials from current clients.

Featured Posts

How To Choose a New Laptop

How To Create a Shared Calendar in Outlook & Microsoft 365?

17 New Cyber Liability Insurance Questions Your Provider Will Ask

Atlanta Real Estate Firm Gets Ransomware

Why Hackers Target Small Businesses

Cloud File Sync and Share Provides Speed and Efficiency

Office Location

© 2000–2023 · Boost IT, LLC · Coverage Area

  • SERVICES
  • OUR CLIENTS
  • OUR TEAM
  • BLOG
  • CONTACT