How to share contacts in Outlook 2016 and Office 365 with specific people in your organization
Knowing how to share contacts in Outlook 2016 and Office 365 can be a huge timesaver for companies of any size.
The default Contacts folder in Outlook is created in each Outlook profile. This folder can’t be renamed or deleted. You might have additional contact folders. You can share any of these folders by doing the following:
- In People, in the folder pane, click the contact folder that you want to share with a person in your organization.
- Click Home. Then, in the Share group, click Share Contacts.

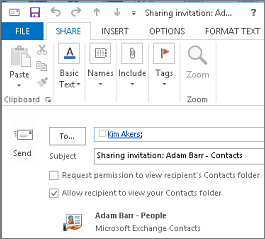
- In the To box, enter the name of the recipient for the sharing invitation message. If you want to, you can change the Subject.

- If you want to, request permission to view the recipient’s default People folder. To do so, select the Request permission to view recipient’s Contacts folder check box.
NOTE: If you want to request access to a contacts folder other than the recipient’s default People folder, you must send an email message that asks for permissions to that particular folder. This option only requests access to the recipient’s default People folder.
- In the message body, type any information that you want to include, and then click Send. Review the confirmation dialog box, and then if correct, click OK.
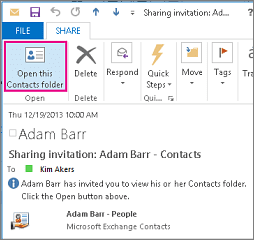
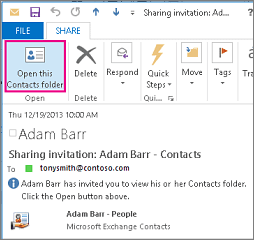
- The person in your organization receives the sharing invitation in email, and clicks Open this Contacts folder.

Share with specific people outside your organization
The default Contacts folder in Outlook is created in each Outlook profile. This folder can’t be renamed or deleted. You might have additional contact folders. You can share any of these folders by doing the following:
- In People, in the folder pane, click the contact folder that you want to share with a person outside your organization.
- Click Home. Then, in the Share group, click Share Contacts.

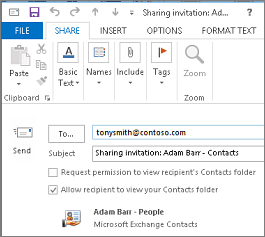
- In the To box, enter the name of the recipient for the sharing invitation message. If you want to, you can change the Subject.

- If you want to, request permission to view the recipient’s default People folder. To do so, select the Request permission to view recipient’s Contacts folder check box.
NOTE: If you want to request access to a contacts folder other than the recipient’s default People folder, you must send an email message that asks for permission to that particular folder. This option only requests access to the recipient’s default People folder.
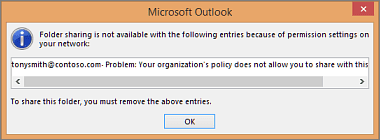
- In the message body, type any information that you want to include, and then click Send. Review the confirmation dialog box, and then if correct, click OK. If the following error displays when you try to send the sharing invitation, sharing contacts with people outside of your organization is not supported by the sharing policy for your organization. Only an admin in your organization can change the sharing policy for your organization. For more information, see the end of this section.

- The person outside your organization receives the sharing invitation in email and clicks Open this Contacts folder.

If you receive an error when you try to share your contacts with someone outside your organization, contact the person that manages your email account.
Share a contacts folder with everyone
- In People, in the folder pane, click Contacts.
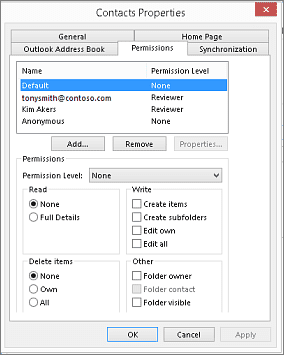
- Click Folder. Then, in the Properties group, click Folder Permissions.
- In the Name box, click Default.
- Under Permissions, in the Permission Level list, click Publishing Editor or any of the other options.
Revoke or change other people’s access
To change or revoke someone’s access permissions to your contacts folders, do the following:
- In People, in the Folder Pane, click the contacts folder for which you want to change permissions.
- Click Folder. Then, in the Properties group, click Folder Permissions.
- On the Permissions tab, do one of the following:
- Revoke or change access permissions for everyone In the Name box, click Default.. Under Permissions, in the Permission Level list, click None to revoke permissions or any of the other options to change permissions.
- Revoke or change access permissions for one person In the Name box, click the name of the person whose access permissions you want to change. Under Permissions, in the Permission Levellist, click None to revoke permissions or any of the other options to change permissions.

- Click OK.
Folder sharing permissions
| With this permission level (or role) | You can |
| Owner | Create, read, change, and delete all items and files, and create subfolders. As the folder owner, you can change the permission levels that other people have for the folder. (Doesn’t apply to delegates.) |
| Publishing Editor | Create, read, change, and delete all items and files, and create subfolders. (Doesn’t apply to delegates.) |
| Editor | Create, read, change, and delete all items and files. |
| Publishing Author | Create and read items and files, create subfolders, and change and delete items and files that you create. (Doesn’t apply to delegates.) |
| Author | Create and read items and files, and change and delete items and files that you create. |
| Nonediting Author | Create and read items and files, and delete items and files that you create. |
| Reviewer | Read items and files only. |
| Contributor | Create items and files only. The contents of the folder don’t appear. (Does not apply to delegates.) |
| None | You have no permission. You can’t open the folder. |
You can create custom permissions by selecting the appropriate check boxes and options under Permissions.


