• Skip to primary navigation
  • Skip to main content
  • Skip to footer
Boost IT

Boost IT

Managed IT Services, Cybersecurity, & Cloud

  • SERVICES & SOLUTIONS
    • IT MANAGEMENT >
      • Take an IT Self-Assessment
      • IT Assessment
      • 24/7 Help Desk Support
      • Managed IT Support
      • Mobile Workforce
      • Software Updates
      • Remote Server Monitoring
      • Wi-Fi
    • IT SECURITY >
      • Take a Cybersecurity Self-Assessment
      • Cybersecurity Assessment
      • Endpoint Detection & Response
      • Multi-Factor Authentication (MFA / 2FA)
      • Security Operations Center (SOC) Support
      • HeatShield Perimeter Firewall
    • IT CONSULTING >
      • IT Insight & Ongoing Guidance
      • vCIO – Virtual CIO
    • CLOUD >
      • Data Backup & Disaster Recovery
      • Microsoft Office 365 & E-mail
      • Cloud File-Sharing Platform
      • Business Phone System
    • Frequently Asked Questions
  • OUR CLIENTS
    • Engineering
    • Financial Services
    • Healthcare
    • Real Estate Development
    • Projects
    • Testimonials
    • Transition to Boost IT
  • OUR TEAM
    • One IT Question
    • Our Proven Process
    • Our Partners
  • BLOG
  • CONTACT
    • Book a Meeting
    • Client Portal
    • Remote Support
You are here: Home / How To / How to Take a Screen Shot

How to Take a Screen Shot

July 21, 2014 by Boost IT

How to take a Screen Shot

How to Take A Screen Shot

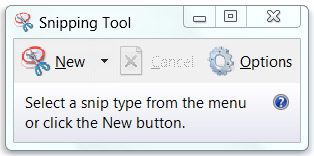
You can use Snipping Tool in Windows 7, Windows 8 or Windows 10 to take a screen shot, or snip, of any object on your screen, and then annotate, save, or share the image.

You can capture any of the following types:
Free-form Snip. Draw a free-form shape around an object.
Rectangular Snip. Drag the cursor around an object to form a rectangle.
Window Snip. Select a window, such as a browser window or dialog box, that you want to capture.
Full-screen Snip. Capture the entire screen.

After you capture a snip, it’s automatically copied to the Clipboard and the mark-up window. From the mark-up window, you can annotate, save, or share the snip. The following procedures explain how to use Snipping Tool.

To capture a snip

  1. Open Snipping Tool by clicking the Start button.

    How to take a screen shot

     In the search box, type Snipping Tool, and then, in the list of results, click Snipping Tool.

  2. Click the arrow next to the New button, select Free-form Snip, Rectangular Snip, Window Snip, or Full-screen Snip from the list, and then select the area of your screen that you want to capture.

To capture a snip of a menu

If you want to capture a snip of a menu, such as the Start menu, follow these steps:

  1. Open Snipping Tool by clicking the Start button. How to take a screen shotIn the search box, type Snipping Tool, and then, in the list of results, click Snipping Tool.

  2. After you open Snipping Tool, press Esc, and then open the menu that you want to capture.

  3. Press Ctrl+PrtScn.

  4. Click the arrow next to the New button, select Free-form Snip, Rectangular Snip, Window Snip, or Full-screen Snip from the list, and then select the area of your screen that you want to capture.

To annotate a snip

  • After you capture a snip, you can write and draw on or around the snip in the mark-up window.

To save a snip

  1. After you capture a snip, click the Save Snip button in the mark-up window.

  2. In the Save As dialog box, enter a name for the snip, choose a location where to save the snip, and then click Save.

To share a snip

  • After you capture a snip, click the arrow on the Send Snip button, and then select an option from the list.


For more information about Snipping Tool, see Windows Help Online and don’t forget to select your version of Windows in the drop-down box at the top right.

Filed Under: How To

Connect With Us

  • Facebook
  • Instagram
  • LinkedIn
  • YouTube

Footer

Next Steps

Start with the SOLUTIONS menu above.

Take an IT Self-Assessment.

Take a Cybersecurity Self-Assessment.

Read Case Studies about how we’ve helped our clients transform their companies.

View Testimonials from current clients.

Review some of our Projects.

Featured Posts

How To Choose a New Laptop

How To Create a Shared Calendar in Outlook & Microsoft 365

17 New Cyber Liability Insurance Questions Your Provider Will Ask

Atlanta Real Estate Firm Gets Ransomware

Why Hackers Target Small Businesses

Cloud File Sync and Share Provides Speed and Efficiency

Office Location

© 2000–2023 · Boost IT, LLC · Coverage Area

  • SERVICES & SOLUTIONS
  • OUR CLIENTS
  • OUR TEAM
  • BLOG
  • CONTACT