• Skip to primary navigation
  • Skip to main content
  • Skip to primary sidebar
  • Skip to footer
Boost IT

Boost IT

IT Management, Cybersecurity, & Cloud

  • SERVICES
    • IT MANAGEMENT >
      • Take an IT Self-Assessment
      • IT Assessment
      • 24/7 Help Desk Support
      • Remote Workforce
      • Software Updates
      • Remote Server Monitoring
      • Reporting & Documentation
      • Wi-Fi
    • CYBERSECURITY >
      • Take a Cybersecurity Self-Assessment
      • Cybersecurity Assessment
      • Endpoint Detection & Response
      • Multi-Factor Authentication (MFA / 2FA)
      • Security Operations Center (SOC) Support
      • HeatShield Perimeter Firewall
    • IT CONSULTING >
      • vCIO – Virtual CIO
    • CLOUD >
      • Data Backup & Disaster Recovery
      • Microsoft Office 365 & E-mail
      • Cloud File-Sharing Platform
      • Business Phone System
    • Frequently Asked Questions
  • OUR CLIENTS
    • Engineering
    • Financial Services
    • Healthcare
    • Real Estate Development
    • Testimonials
    • Transition to Boost IT
  • OUR TEAM
    • One IT Question
    • Our Proven Process
    • Our Partners
  • BLOG
  • CONTACT
    • Book a Meeting
    • Client Portal
    • Remote Support
You are here: Home / How To / Configure Outlook E-mail on iPhone / iPad

Configure Outlook E-mail on iPhone / iPad

September 29, 2016 by Boost IT

How to configure Outlook e-mail on iPhone

Follow the steps below for how to configure Office 365 on iPhone.

Step 1
Image of a grey line

Note: If you have a work account that requires the Intune Company Portal app, install it from the App Store before setting up Outlook for iOS. Your IT admin may or may not also require you to Enroll your iOS device in Intune.

Download Outlook for iOS from the iOS App Store and then open it. The icon looks like this:

iOS Outlook app

Note: See system requirements for your iOS devices here.

Step 2
Image of a grey line
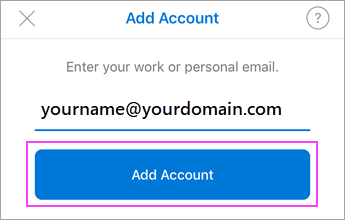
If it’s your first time using Outlook for iOS, enter your full email address, then tap Add Account.

If not, open the Menu > tap Settings Outlook app settings > Add Account >Add Email Account.

Enter your email address

Step 3
Image of a grey line
If you’re asked to select your email provider, please contact your IT admin for support as there may be a misconfiguration.

You can also set up your email account manually or use IMAP/POP.

Step 4
Image of a grey line
Enter your email account password and tap Sign In.

Note: The sign in screen may look different for you depending on your email provider.

Enter your Outlook.com password

Step 5
Image of a grey line
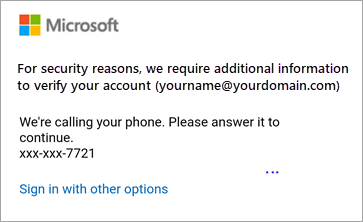
If multi-factor authentication is enabled, verify your identity. For more information, see Security info overview.

Check your text messages and enter the 6 digit code.

Step 6
Image of a grey line
Accept any prompts for permission you may receive.

Swipe through the features and you’re now ready to use Outlook for iOS!

If you want to learn more about Microsoft 365, click HERE.

If you want to know how to configure Office on Android, click HERE.

Filed Under: How To

Connect With Us

  • Facebook
  • Instagram
  • LinkedIn
  • YouTube

Primary Sidebar

Have questions about cybersecurity?

We've successfully protected Healthcare, Legal, Financial Services, Engineering, Manufacturing, Non-Profit & Real Estate Development organizations for over 20 years.

Click below to see the questions on your next cyberinsurance application!

See the cyberinsurance application

Footer

Next Steps

Start with the SERVICES menu above.

Take an IT Self-Assessment.

Take a Cybersecurity Self-Assessment.

Read Case Studies about how we’ve helped our clients transform their organizations.

View Testimonials from current clients.

Featured Posts

How To Choose a New Laptop

How To Create a Shared Calendar in Outlook & Microsoft 365

17 New Cyber Liability Insurance Questions Your Provider Will Ask

Atlanta Real Estate Firm Gets Ransomware

Why Hackers Target Small Businesses

Cloud File Sync and Share Provides Speed and Efficiency

Office Location

© 2000–2023 · Boost IT, LLC · Coverage Area

  • SERVICES
  • OUR CLIENTS
  • OUR TEAM
  • BLOG
  • CONTACT